The correct position on the horse´s back:
1. Palpation of the scapula:
To place your American-Flex saddle on the right position, you have to feel for the shoulder blade of the horse first. Locate the end of the scapula, where the bone is felt.
For heavily muscled or overweight horses, this is sometimes difficult. Press - if needed - a little stronger, until you really feel the bone and its course. If you are not sure, ask a helper to lift the front leg of your horse forward. In the motion you can feel the scapula easier by the rotation.
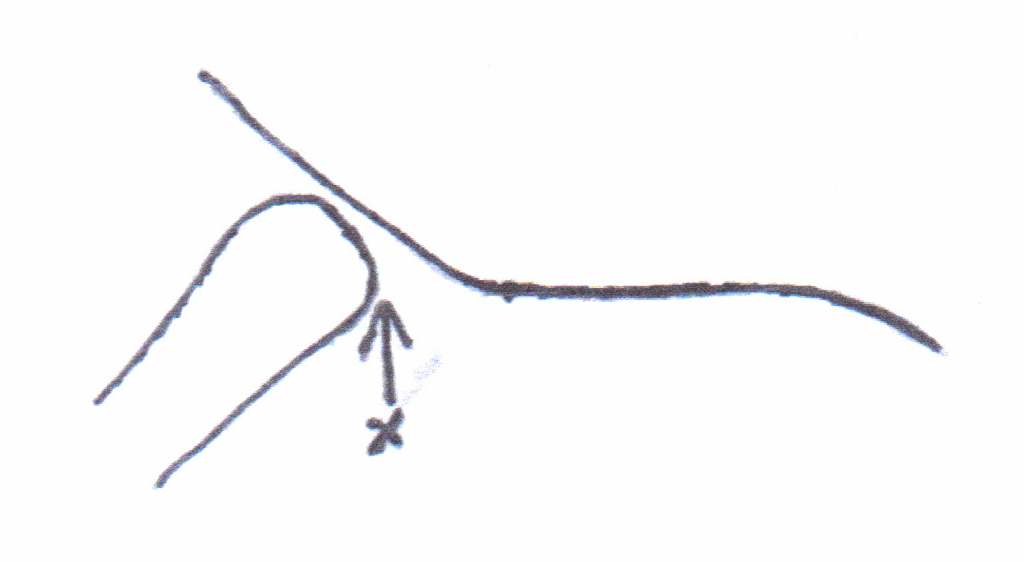 |
Make sure that your horse is standing straight. Only when the front leg - that you take for orientation- is really straight, will the shoulder blade be in the position that you need to proper placing.
2. The placement of the saddle:
Our saddle system is independent of the shape of the saddle tree in the front region and has a lamella-like structure that provides a smooth rolling of the shoulder blade. At the same time, we also use the multi-layered structure of our panel and thus takes a different load distribution instead.
If you have found the end of the shoulder blade, you should imagine a vertical line. The front edge of the panel should overlap with this line about two fingers (about 3-4 cm).
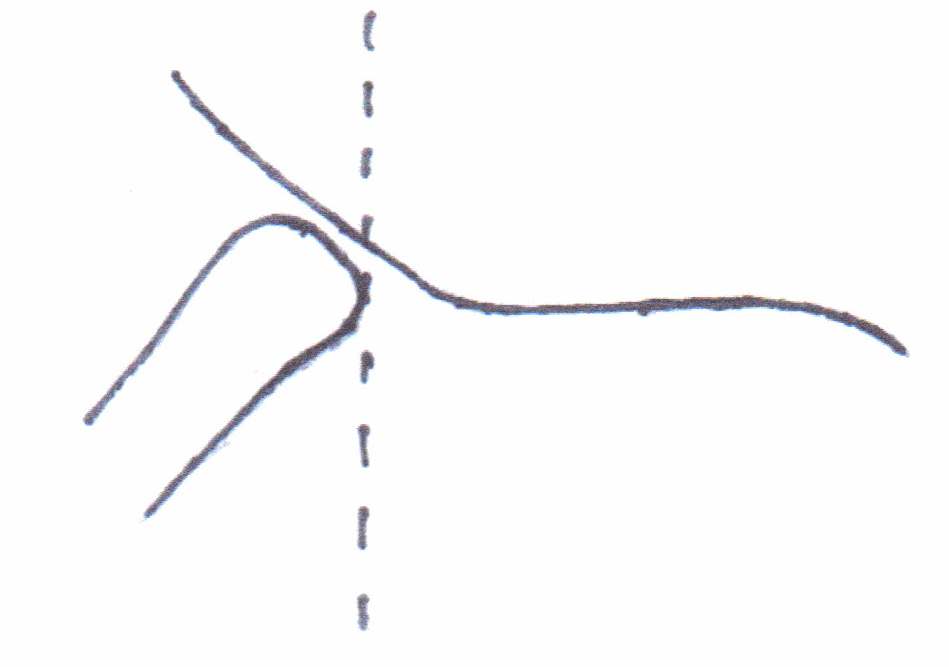 |
On some horses, this overlap may be a little more or less. On horses with very wide shoulders, the overlap is slightly lower because the panel have to "open" very far in the movement of the horse. On horses, where the shoulder extends very obliquely and far to the horse center, the overlap may also be a little more. But these are the exceptions, the standard rule is two fingers.
In the Western saddles, please remember that the panel is sewn into the skirts. The front edge of the panel begins here about one to 1.5 cm after the Skirt.
Depending on the individual girth-area of your horse, yopu may have to adjust the rigging so your saddle will stay in the correct position.
If you are unsure whether your saddle is properly fitted and can work with, you can pretty easily control the free space for the shoulder blade. Put somebody in the saddle, so that the panels conforming to the horse's body. Now slide your flat hand between the front of the panel and the horse body, just over the shoulder blade. The get your hand between could be a little difficult because the panel makes a close contact to the horse´s body. If you have your hand now between panel and horse body, let the horse move forward. You'll feel on your hand how far the radius of action of the scapula is. The radius of the scapula should not reach so far, that it comes below the mounts of the panels. But this would you feel on the top of your hand. It is uncomfortable or even hurt. In this case, your saddle should be positioned slightly further back. However, please remember that you are naturally feel the burden of the rider's weight on your hands. The panel system is indeed no magnetic-levitation train. But if you do not find it uncomfortable or even painful to your hand, it is also ok for your horse.
Compared to traditional - especially English saddles - you will probably find that the positioning of the rider is a little further back. Resist the temptation to put the saddle - perhaps from optical habits - forward. You probably will block the function of the system (see above). In many traditional saddles, the rider is - by (mis-) design - positioned too far forward, with negative effects on the horse. The viable area of the horse's back is much bigger than some saddlemakers try us to make believe.
Also that the panels reach more backwards should not irritate you. The panel does not only adapt to the horse´s shape, it will also make room in the ends if neede by the horse in movement. The adverse effect of bridging - traditional saddles usually occurs - will not happen with the panel-system. As a rule of thumb the panels may extend up to three fingers wide to the hipbones.
First forget the myth that a belt should lay a hand-wide behind the front legs. That would mean that all horses are equal and we all have the same size hands. The belt should liay in the individual girth-area of the horse, as specified on the respective horse. You must make sure that the radius of action of the horse is not obstructed and the elbow of the horse does not come in conflict with the buckles. If you have chopsen a girth of us, we have been very appreciated from our side on a horse friendly girth. These are in the area of the elbow significantly narrower to fit also horses with narrow girth-area. Through this form you effectively prevent a slipping forward of the belt together with the saddle. Also with horses that are a little bit more "rounded". At the same time are our belts in the middle and at the ends much wider to distribute the forces over a larger area and by their slightly slanting form they work perfect with our rigging.
By the girth length you should choose it always as long as possible to get the full advantages of the girth. The girth is part of stabilizing your saddle. The length should be sized so that the horse does not interfere with the buckles in conflict but also the rider's leg is not obstructed.
If you to tighten-up your American-Flex saddle, so should this be really tight. Remember that the panels adapt finally to the horse´s shape by rider´s weight but in the beginning by tightening the girth. Tight the girth step by step so you just can get your fingers between the girth and horse body, but the belt can not deduct from the horse's body. If the rider's weight is in the saddle, you will again have some "space" between the girth and the horse's body. You are now comfortable with your fingers come in between. This little "space" is to remain, so that the system can work. Don´t fasten the girth while you are sitting in the saddle. From the back of your horse you have much more power to fasten the girth. Perhaps so much power that you "overtight" with the result that the panels will loose the "space" they need to work.
You don´t need to have a bad conscience by a very firm tightening of the belt. You will not kill your horse, nor hinder breathing. The first eight pairs of ribs of the horse are firmly adherent to the sternum. What is commonly referred to as "deflate" the horse is in reality only a lessening of tension in the muscles.
That has many horses react defensively by tightening a girth is in most cases caused by badly fitting saddles and / or bad girths. Unfortunately is it often a result of bad experience that the horse can´t forget. If you have a horse that reacts defensively by tightening the girth, ask us for a little "trick" that helps your horse to understand that nothing bad happens anymore.
But back to the girth tension: of course, you should take care on the girth tension even during riding. The girth should not be too loose, it stabilizes the saddle and it is you, who sits in the saddle.
Therefore, check the girth tension frequently. Especially if the saddle is new or the saddle pad comes fresh from the laundry. The fabric sets together and so is the girth getting loose. At the Western saddles the skirts are at the beginning a little bit tough and stiff. With the time, they are getting softer and more flexible. This also "sets" the saddle.
Also check with longer rides regularly the girth tension. By limp muscles and loss of water your horse loses in circumference and thus loosens the girth. Another tip to loosen the girth after a long and / or strenuous ride: loose the girth slowly and gradually, not abruptly. The fine blood vessels will be a little pinched in the girth area. If you remove the girth after an exhausting ride abruptly, the blood would shoot intothe blood vessels in cause of increased heart rate and blood pressure and the blood vessels may burst.
4. Balancing of the saddle:
In general, the saddle balance itself on horseback. But with a few horses it is necessary to manually balance the saddle. If your saddle is in the correct balance, also you feel in balance. You should be able to walk, trot and canter without stirrups, without falling forward or backward (horsemanship provided of course). In short words: you should be able to ride in harmony with the horses movement.
If your saddle lays too high in the front, you feel as if you were behind the movement of the horse. You are falling against the cantle, have a hard time to stay in the stirrups or can´t sit deep. Your saddle you will likely feel wider than it is. Thus, the saddle is too high in the front, your thighs are in fact present on the widening of the seat.
Too high in the front: |
Front too high may mean that the rider falls backward in the saddle. This can cause pain in the loins of the horse. Please check whether the "Adjuster" are completely turned in. If this is the case and the saddle is still too high, push it slightly back and possibly adjust the angle of the rigging something forward, so that the girth again comes to lay in the girth area.
Front too low:
 |
Side inclined:
This condition of a horse causes often that a saddle is slightly to one side. This is usually the result when the horse is stronger on one side. The rider may believe it is crooked or the saddle tree is crooked. Often this is caused by a rider galloping on only one hand or sitting diagonally. Sometimes a horse is also predisposed to this one-sidedness.
The goal must be, to ride/train the horse so that it is symmetrical with time. Not an easy task if the rider due to the skewness of the horse must fight even with his own lateral balance.
Our panel system can, to a certain degree, also compensate for asymmetries of the horse, because the panels adapt to the horse independently on each side. With very strong asymmetries further action may be necessary. For this purpose, your saddle are equipped with the "Adjustable System". If your horse is very one-sided and one side is much stronger than the other, you can raise the saddle by using the "Adjuster" to balance the sides. Of course is your horse still asymetric, but now you are sitting balanced and can work your horse to be also symetric soon.
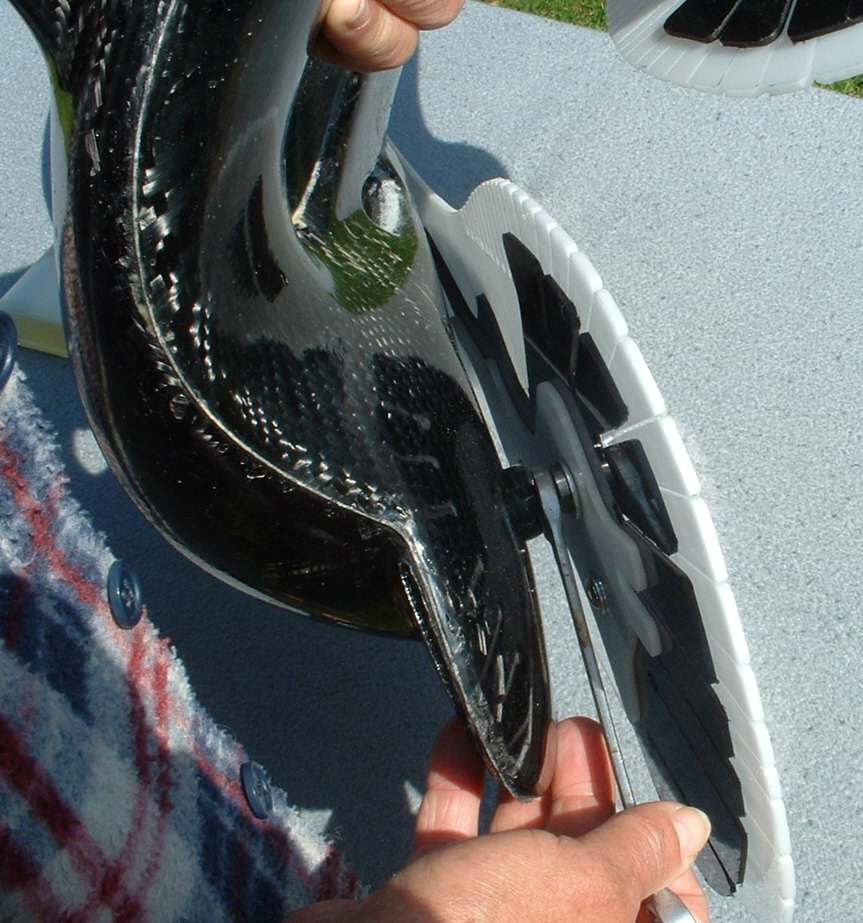
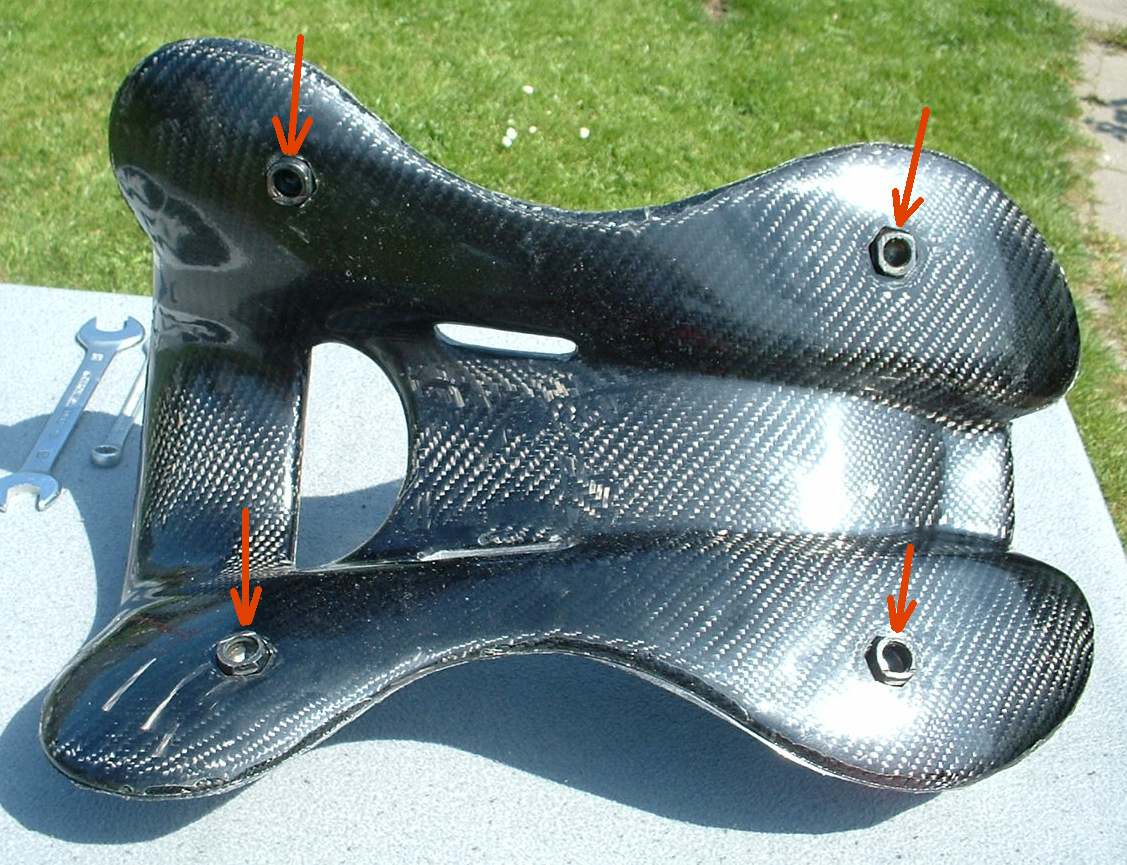
6. The Adjustable-System:
The Adjustable-System is a tool that makes it possible for you to balance your saddle without big effort. Note: this description is valid for our newest generation of saddles. To find out if your saddle has an "Adjustable System" check the serial number. The serial number should start with to or three letters followed by "14" or higher, than some more numbers and in the end should be "NG".
 |
 |
 |
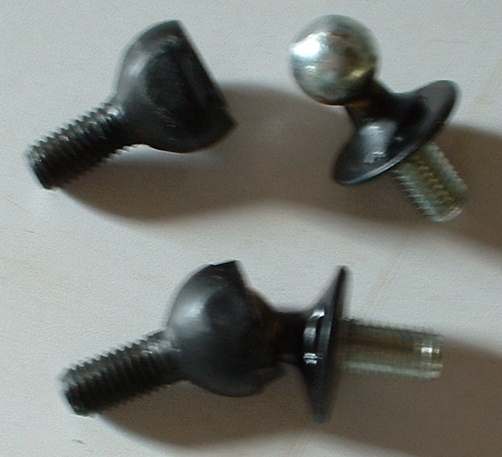
| The four joints | Adjuster in "normal" position | "Adjuster" turned out |
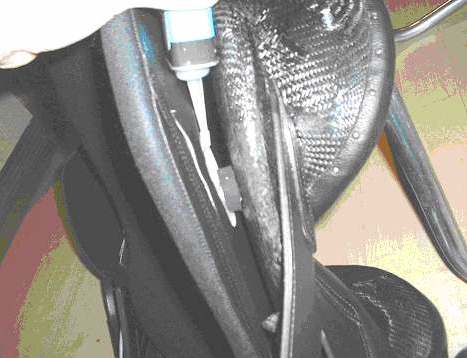
| You can level the saddle at all four corners with this system. Just take the panels off , as described below under "Maintenance". With a 20 or 22-end wrench ( depends on the version that was built into the saddle ), you can unscrew the socket. Fix it then with a medium strength thread locking fluid in the desired position. Allow the thread locking fluid to dry and then put the panels back on. The joints allow a leveling of about 1.5 cm. Depending on the saddle-model, or, if you need an higher adjustment, just order from us, sockets with a longer thread. |
7. Trouble shooting:
There occur very rarely problems with the use of an American-Flex saddle. But we are not always immune against a scrub in the loins. Scrub means that the hairs are rubbed off or break off. This can lead to pressure sores or friction pain.
Where we differ here after the "phenomenon" of hair breakage during moulting and rubbing for other reasons.
The rubbing of hair in the lumbar region during moulting is usually a purely cosmetic "problem." It can happen to you with any saddle and / or saddle pad and is simply due to the changing structure of the hair coat. The horse in this case also shows no sensitivity, which pressure or friction pain. This phenomenon can be remedied by using a second, thin pad under the saddle. This will function as a kind of "overlay" and prevents breakage of dying hair.
But if your horse shows pain, there are causes that require corrective.
1. Loin rubbing can be caused by a saddle that is too far forward and/or the front too high. Thus your rider weight shifts backwards and brings overly to much pressure on the rear.
2. Another reason may be a saddle where the front is too low. It hangs then next to the withers, where are only little lateral movement. Meanwhile, the panels have very little contact with the horse's back and hindquarters swinging under the panels back and forth. In this case, lack of contact is the reason.
If so, a correct placement of the saddle on the horse's back is the solution. In rare cases, a balance of the saddle by the use of the "Adjuster" is necessary.
3. Usually loin-rubbing is caused by two other factors: a saddle where the front is too low and a rider who is standing in the stirrups, leaning to the front. This is a very bad combination. The forward-facing standing in the stirrups is very detrimental to the horse, because all the weight and vibration must be carried by the front third of the saddle. When the weight is concentrated on the front of the saddle, pressure on shoulders and withers is inevitable. The horse raises his head, pushing away his back and further contact in the saddle center is getting lost. Standing in the stirrups shifts the rider's weight too far forward, forcing the horse to go faster or even to fall into a powertrot. It overloads the flexor tendons at the front leg and makes it difficult for the horse to maintain the balance.
4. Rubbing in the loins can also occur on a very short horse with strongly curved back, even with a balanced saddle. In such a case, the saddle should be raised by an approximately 10 - 15 mm thick neoprene layer. The rear area is left free to give the panels more space for the upward sweep. It also helps a lot in solving this problem when the horse learns to move in a natural assembly, with deep head down, rounded back and hindquarters moving under.
5. Loin rubbing can also be found on horses that can go extreme "cha-cha-cha-walk", without any assembly.
Keep always in your mind: the right saddle is a building block to a healthy horse's back, correct riding and training of the horse another!